If you’re here, you’ve probably heard that ElasticSearch is awesome and you can do many things, such as searching your databases, aggregating your data and monitoring your servers, collecting logs and auto-suggesting your users’ search input.
This article has the purpose to get you started with ElasticSearch by quickly instlling and running the database on a Linux or MacOS computer, in a few simple steps.
Prerequisites
For this tutorial, you will need two things:
- Open terminal windows - as we will be executing some system commands
- Internet connection
Downloading ElasticSearch
It’s recommended to download the latest version of the software, as it’s usually the most secure and offers best performance. At the time of writing this article, the latest of ElasticSearch is 8.3, but regardless of when you’re reading this article, you can find the latest version on this official page.
Without further ado, you can run this command, to download ElasticSearch on Linux:
1 | wget https://artifacts.elastic.co/downloads/elasticsearch/elasticsearch-8.3.2-linux-x86_64.tar.gz && tar -xzf elasticsearch-8.3.2-linux-x86_64.tar.gz |
1 |
or run this one, if you’re using MacOS
1 | curl -O https://artifacts.elastic.co/downloads/elasticsearch/elasticsearch-8.3.2-darwin-x86_64.tar.gz && tar -xzf elasticsearch-8.3.2-darwin-x86_64.tar.gz |
From here on, the steps overlap, so the commands will be the same for either of these operating systems.
Starting ElasticSearch
The above command will have download the software archive and unarchived it to a folder called elasticsearch-8.3.2.
Navigate to that folder, using cd elasticsearch-8.3.2
There is no further configuration required, so you can start ElasticSearch using the following command:
1 | ./bin/elasticsearch |
After a few seconds, you should see JVM (Java Virtual Machine) initializing and ElasticSearch preparing to start.
After everything is ready and the software have started, you will see notes likes this
1 | ━━━━━━━━━━━━━━━━━━━━━━━━━━━━━━━━━━━━━━━━━━━━━━━━━━━━━━━━━━━━━━━━━━━━━━━━━━━━━━━━━━━━━━━━━━━━━━━━━━━━━━━━━━━━━━━━━━━━━━━━━━━━━━━━━━━━━━━━━━━━━━━━━━━━━━━━━━━━━━━━━━━━━ |
Write down the password, for your elastic user, because you will need it to access ElasticSearch, directly through a browser, Kibana or any other UI.
To test your setup, you can open the URL to your ElasticSearch server in a browser or use CURL to make a request directly from the command line.
Note that the terminal window that we used so far will be blocked by ElasticSearch and if you want to use terminal, you will have to open another window.
1 | curl --cacert $ES_HOME/config/certs/http_ca.crt -u elastic https://localhost:9200 |
If everything went fine, you will asked to login with username elastic and the password, generated by ElasticSearcg.
After that, you will be greeted with this message from the web page:
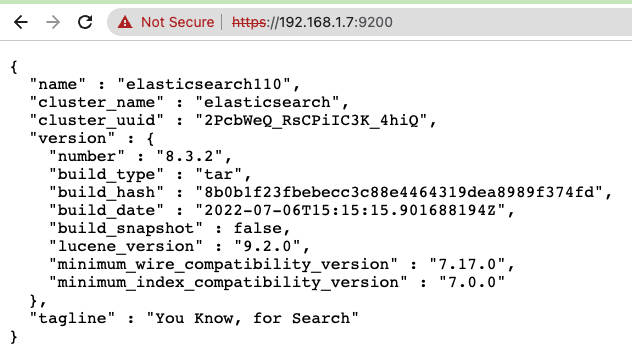
If you see the following message, you need to switch from using http to https:

Running in the background
As you can already see, running ElasticSearch in the terminal, like this, is not very convenient. The terminal windows is blocked and unusable, and ElasticSearch will stop if we close the terminal. To avoid these issues, we can start ElasticSearch in the background, where it will be running until we stop it, even after the terminal is closed or the computer is restarted. We can do that with the following command:
1 | ./bin/elasticsearch -d -p pid |
Note: ElasticSearch will stop when your server is restarted or shutdown and will not start automatically when the server is turned on. To make ElasticSearch run on startup, you will have to install the system.d package.
Comments